Monster Pancakes

Monsters have never been less scary.

Monster Pancakes photographed by The Eclectic Kitchen

Monster Pancakes photographed by The Eclectic Kitchen

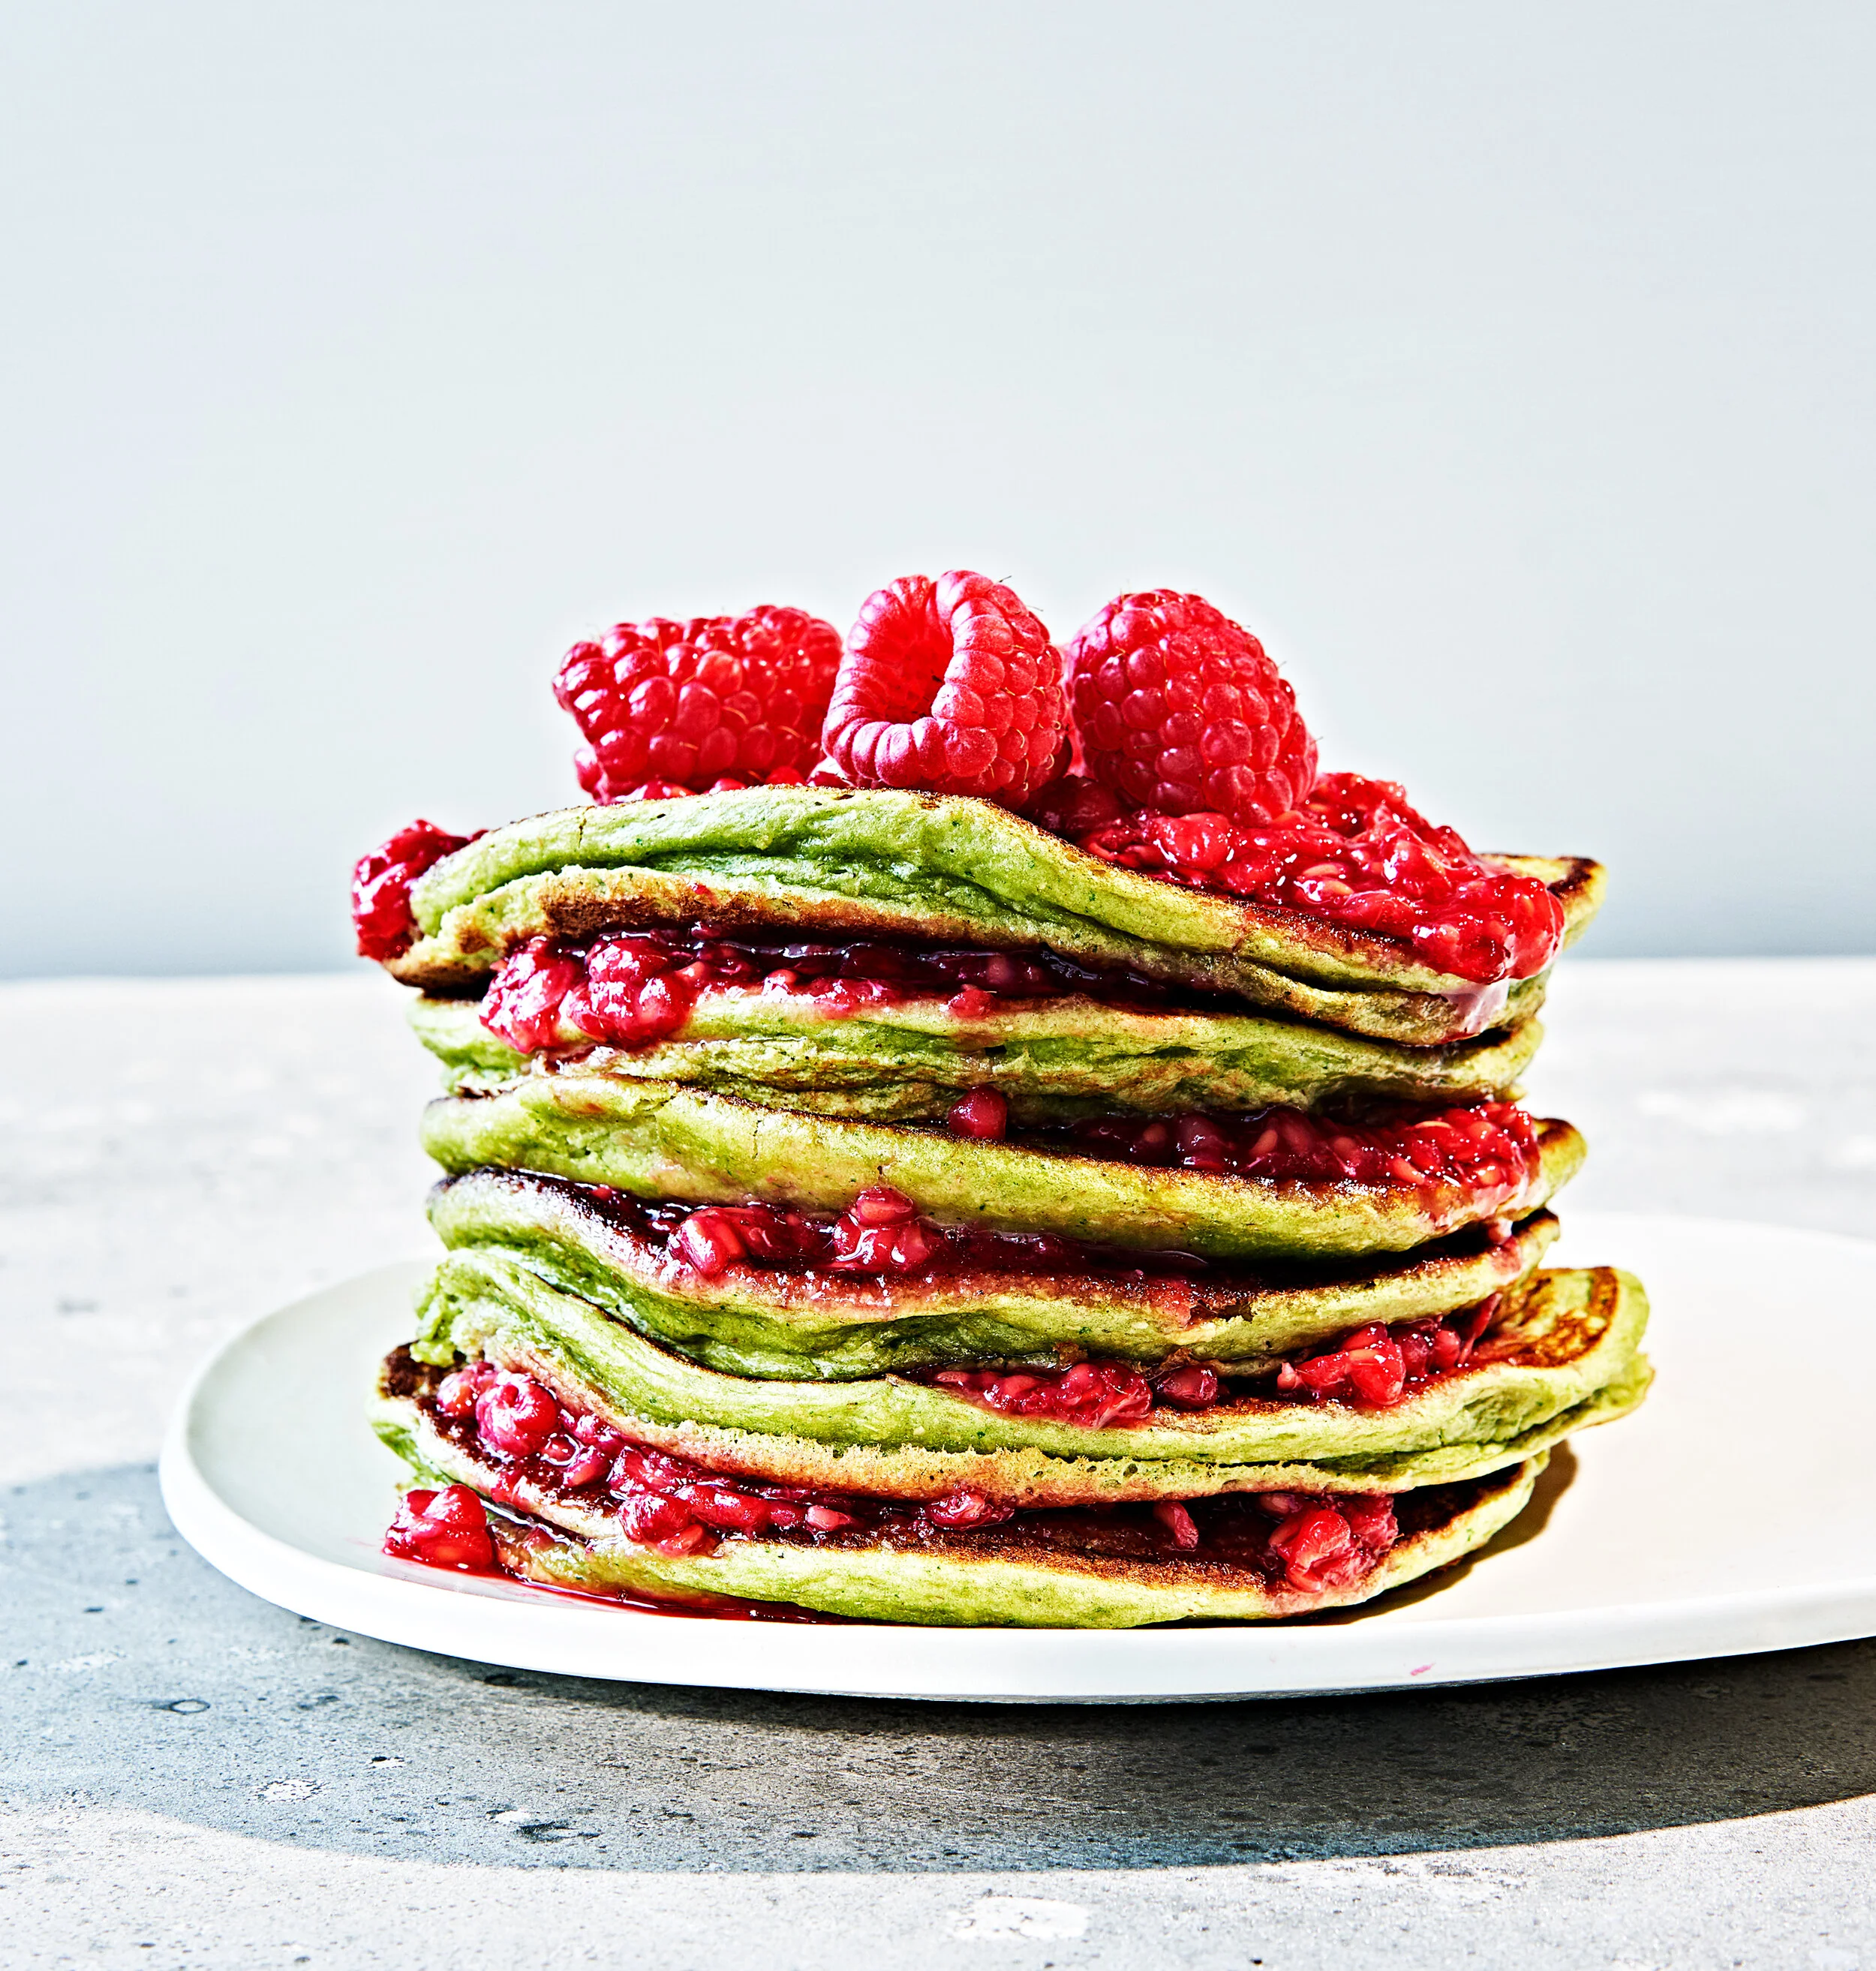
These pancakes are a STAPLE in my house. Since my son was about 6 months old and I started some very simple baby led weaning, I began blending spinach, avocado and other nutrients into his pancakes. The idea wasn’t necessarily to hide the veggies, but make them easier to manage in the form of a pancake! Think of it as more nutrient bang for your buck. He is almost 2 and I still make these once a month in batches and keep them in the freezer for quick school morning breakfasts. You can even see my husband sneaking a few once in a while! I hope you enjoy these nutritious and protein filled pancakes as much as we do!!

Monster Pancakes 

Recipe By: Skylar Edberg in collaboration with The Eclectic Kitchen 

Prep Time: 5 minutes 

Cook Time: 10 minutes 

Yields: 20 mini pancakes or 10 medium 

INGREDIENTS

½ cup whole milk, plus more if needed 

¼ avocado 

½ banana 

½ cup spinach leaves 

2 cups kodiak cake mix or gluten free pancake mix 

½ cup water

4 tablespoons unsalted butter 

Fresh raspberries and syrup for garnish 

METHOD

Blend the milk, avocado, banana and spinach in a blender over high speed until smooth. Add the mixture to the pancake mix along with half of the water and stir until a smooth batter is formed. Add additional milk 2 tablespoons at a time if the mixture is too thick. 

In a non-stick skillet over medium/low heat,  melt one tablespoon of butter. Place ¼ cup of batter on the skillet and cook for about 3 minutes on each side until golden and cooked through. For mini pancakes use 2 tablespoons of batter and cook for about 2 minutes on each side. 

Top with mashed raspberries and maple syrup and serve! For little ones under two or three raspberries or fruit puree are sweet enough. 


Breakfast Pasta

Because Breakfast for Dinner Can Never be argued with…

BREAKFAST PASTA

INGREDIENTS

8 ounces dried spaghetti or pasta of choice

6 bacon slices or breakfast sausage links, diced 

2 tablespoons unsalted butter 

2 garlic cloves minced

¼  cup grated Parmesan cheese

⅓  cup toasted bread crumbs 

½ teaspoon kosher salt

¼ teaspoon cracked black pepper 

4 eggs

Minced chives, red pepper flakes for garnish. 

METHOD

In a large stock pot, cook pasta according to package directions. Reserve 1 cup pasta water. 

Drain; set aside. 

In a large rimmed skillet, cook bacon over medium/low heat until crisp. Transfer meat to a paper towel and pour any remaining drippings into the stock pot used for pasta. 

Over medium heat, add butter and garlic to the bacon drippings and saute about 1 minute until fragrant. Toss in the pasta and add enough reserved pasta water to loosen. Add in the meat and breadcrumbs and toss to combine. 

Heat the large skillet used to cook the bacon over medium heat. Break eggs into the skillet. And cook eggs for 3 to 4 minutes until the white is firm and the yolk is slightly runny. 

Top the pasta with bacon, bread crumbs, eggs, chives, parmesan cheese, pepper flakes. 

Enjoy! 


Fire Roasted Salsa Verde

Because sometimes mom and dad need a snack of their own.

Photography by The Eclectic Kitchen

Photography by The Eclectic Kitchen

Fire Roasted Salsa Verde

Recipe By: Skylar Edberg in collaboration with The Eclectic Kitchen

INGREDIENTS

1 1/2 lb tomatillos

2 jalapeno peppers  

2 pasilla or poblano peppers

½  of a white onion, chopped 

4  garlic cloves 

½  cup cilantro leaves

2 tablespoons fresh lime juice from 2 limes 

3 teaspoons kosher salt 

Water for thinning if needed 

METHOD

Adjust oven rack about 6 inches below the broiler and set broiler to HIGH. Place the tomatillos and peppers on a rimmed baking sheet and broil for about 15 minutes, rotating every 5 minutes. The peppers and tomatillos should bubble and have blackened blisters. Remove from the oven and cool to room temperature. 


Once cool, remove the tomatillo leaves along with the stems and seeds from the peppers and transfer to a food processor fitted with a chopping blade. Add the onions, garlic, cilantro, lime and salt and pulse until slightly chunky. Store in an airtight container for up to 1 week. Enjoy! 


Clean Eating Shepard’s pie

Just because it’s clean, doesn’t mean it can’t be delicious!

This lighter and more modernized version of shepard’s pie is sure to be a weekly staple on your table! Typically this dish is heavy, mushy and lacks in flavor, but add some tender seasonal veggies, ground turkey and mashed sweet potato and you have yourself a revamped main dish that doesn’t require any sides! The eclectic kitchen and I hope you love this recipe and as always love to hear your feedback!

Clean Eating Shepard’s Pie

Recipe By: Skylar Edberg in collaboration with The Eclectic Kitchen

Yield: 6-8 servings

Prep time: 25 min 

Cook time 1 hour 


INGREDIENTS

2 pounds sweet potatoes, peeled and cubed

3 tablespoons unsalted butter, divided

3 teaspoons kosher salt, divided

1 pound ground turkey

2 teaspoons onion powder

2 teaspoons garlic powder

½  teaspoon black pepper

1 large onion finely diced

3 garlic cloves, grated

2 tablespoons tomato paste

2 cups frozen corn,  thawed

1 large zucchini, diced 

1 red bell pepper, seeded and diced

2 cups frozen diced green beans

METHOD

Preheat the oven to 350° F.

Transfer the sweet potatoes to a large pot of salted boiling water over high heat and cook for about 15 minutes until fork tender. Whip the sweet potatoes with one tablespoon of butter and 1 teaspoon of kosher salt using a fork or a handheld mixer until fluffy, about 3 minutes. Set aside. 

In a large bowl, combine the turkey, onion powder, garlic powder and black pepper. 

Melt remaining butter in  a large skillet over medium-high heat. Add onion and remaining salt and cook for about 5 minutes until softened. Next add the garlic and tomato paste and cook until fragrant, about 3 minutes. Add the corn, zucchini, bell pepper and green beans and sauté for 5-7 minutes until softened. Using your spatula, Push the vegetables to one side of the pan and brown the turkey mixture for another 6-8 minutes until cooked through stir all ingredients together and transfer to a 9x13 baking dish greased with non-stick cooking spray or butter. 


Top with the meat mixture with the sweet potato mash and bake for 15-20 minutes or until the top is just starting to crisp. Broil for 5 minutes to brown. (optional)

Sprinkle with parmesan cheese and chives and Serve.


Sticky Lemon Drumsticks

Finger lickin’ chicken

Photography by The Eclectic Kitchen

Photography by The Eclectic Kitchen

If you are anything like me, you are SO tired of making the SAME chicken over and over. These sticky lemon drumsticks are a “make ahead”, sweet and tangy twist on the humble and underrated chicken leg. Because this recipe ticks off every taste category on the list, it’s extremely versatile and will please even the pickiest of palettes! Try it with breasts and wings too! Just let me know how you like it and don’t forget to snap a pic of you and your family enjoying!

Sticky Lemon Drumsticks

Recipe By: Skylar Edberg n Collaboration with The Eclectic Kitchen

Yield: 12 drumsticks

Prep time: 30 min - overnight (inactive)

Cook time: 50 minutes

Ingredients

4 pounds chicken drumsticks (about 12 drumsticks)

1 tablespoon kosher salt 

1 teaspoon ground black pepper or red pepper flakes

6 garlic cloves, grated

1 tablespoon lemon zest

3 tablespoons lemon juice

¼ teaspoon grated nutmeg 

2 tablespoons olive oil or vegetable oil

¼ cup honey or agave 

1 tablespoon  scallion or chives, mince for garnish 

METHOD

Pat the drumsticks dry using a paper towel. Season the chicken with salt and pepper and set aside. 

In a large zip seal bag, combine the garlic, lemon zest, lemon juice, nutmeg, oil and honey and shake to combine ingredients. 

Place drumsticks into the bag with the marinade and shake to coat. Marinate for 30 minutes or overnight.

Preheat the oven to 375 degrees Fahrenheit.

Place the chicken in a single layer on a baking pan or rimmed baking sheet with the marinade. 

Bake uncovered for 45 to 50 minutes or until cooked through to 165 degrees. Served with lemon wedges and chives. 


Epic Guac

WE DON’T CHARGE EXTRA FOR THIS EPIC GUAC RECIPE

Photography by The Eclectic Kitchen

Photography by The Eclectic Kitchen

Everyone likes there guac a certain way, but when I do guacamole it’s always with a heavy dose of garlic and lime. This ridiculously easy and simple recipe only has 5 ingredients and makes a serious statement. Enjoy everyone’s favorite condiment on nachos, tacos or even burgers! As always, please let The Eclectic Kitchen and I know what you think!

Epic Guacamole

Recipe By Skylar Edberg in collaboration with The Eclectic Kitchen

Prep Time: 10 minutes

Yield: 4 servings 

Ingredients

4 ripe avocados pitted and skin removed.

4 garlic cloves grated

2 teaspoons onion powder 

3 tablespoons freshly squeezed lime juice 

1 teaspoon kosher salt 

⅓ teaspoon black pepper 

½ cup cherry tomatoes diced 

Method

In a medium size mixing bowl, break up the avocados using a fork. Make sure to leave the avocado quite chunky for this guac. Add the garlic, onion powder, lime, salt and pepper and stir until just combined. Stir in the tomatoes and serve immediately with chips or tacos.  


Cauliflower Egg Bites

Easy. Breezy. Cheesy.

Photography By The Eclectic Kitchen

Photography By The Eclectic Kitchen

As much as The Eclectic Kitchen and I would love to watch our kids devour vegetables on the reg, the reality is that it doesn’t always happen! I always try to serve and incorporate new and favorite vegetables into my toddler’s meals, but somedays, he’s just not into it! These Hidden Cauliflower egg bites are my “veggie insurance policy”! I never want to trick him into eating vegetables, but it does make me feel good to know that he’s getting every fiber and minerals in his diet while enjoying these cheese egg cups! I encourage you to try these little gems and please let us know how you like them!

Hidden Cauliflower Egg Bites

Recipe by: Skylar Edberg in collaboration with The Eclectic Kitchen

Yield: 12 egg cups

Prep time: 10 minutes

Cook time: 25 minutes

INGREDIENTS

2 cups riced cauliflower, if using frozen, thaw and drain/dry very well.

2 teaspoons onion powder

½ cup cottage cheese

6 eggs, beaten

1 cup grated cheddar cheese

2 tablespoons parmesan cheese

½ teaspoon kosher salt (Omit for children under 1 year)

¼ teaspoon black pepper (Optional)

Additional vegetables for topping if desired such as mushrooms, tomatoes or spinach.

METHOD

Preheat oven to 350 degrees and grease a non-stick muffin tin with non-stick cooking spray.

In a large bowl using a rubber spatula, combine cauliflower rice, onion powder, cottage cheese, eggs, cheddar cheese, parmesan cheese, salt and pepper until well combined.

Spoon the mixture into the prepared pan, filling each well about ¾ full. Top with any additional toppings and bake for 15-20 minutes until the center of the muffin springs back when touched gently. Removed the egg cups from the oven and allow to cool in the pan for about 7 minutes before serving. Store the egg cups in an airtight container for up to 3 days in the refrigerator of 1 month in the freezer.


No-Bake Cookie Dough Energy Bites

You are 5 ingredients away from better health

Photography By The Eclectic Kitchen

Photography By The Eclectic Kitchen

These No-Bake Cookie Dough Energy Bites are not only vegan, gluten free and dairy free, but they legit taste like you are sneaking a bite right out of a bowl of cookie dough! With only 5 ingredients, a food processor, and about 5 minutes, you can have these delicious energy packed bites on the daily!

In full disclosure, The Eclectic Kitchen and I ate most of these just after we took this shot! We hope these cookie dough bites make snacking easier and more enjoyable!

No-Bake Cookie Dough Energy Bites

Recipe by: Skylar Edberg

Yield: 12 bites

Prep time: 10 minutes

INGREDIENTS

  • 1 cup dates, pitted, packed

  • 1  cup raw, unsalted cashews

  • ½ teaspoon kosher salt

  • 2 teaspoons maple syrup or honey

  • ¼ cup mini chocolate chips

METHOD

Process the dates, cashews, salt and maple syrup in the bowl of a food processor fitted with a chopping blade for about 2 to 3 minutes until the mixture forms a ball.Transfer the mixture to a medium sized mixing bowl and fold in the chocolate chips. Using a tablespoon measure or miniature ice cream scoop, form the mixture into 12 even balls and place on a baking sheet lined with waxed paper or parchment. Chill the dough in the refrigerator for at least 1 hour before serving. Store leftover bites in an airtight container in the refrigerator for 1 week.


Instant Pot Tortilla Soup

The Perfect One Pot Meal to feed an Army

Photography by The Eclectic Kitchen

Photography by The Eclectic Kitchen

Here we go with another Instant Pot recipe! This tortilla soup is ridiculously easy and cooks up so quickly! The chicken is SO tender and I love serving this to the whole family because it’s packed with so many vitamin rich ingredients. I even used tortilla to thicken the soup naturally, which resulted in a beautiful rich broth. After the shoot The Eclectic Kitchen and I almost polished off the entire pot of soup with her little one! This simple recipe cooks up in 20 minutes and tastes like its been cooking for hours! Its packed with veggies, lean protein and complex carbohydrates to keep everyone feeling full and satisfied!

Photography by The Eclectic Kitchen

Photography by The Eclectic Kitchen

Instant Pot Tortilla Soup

Recipe By: Skylar Edberg in collaboration with The Eclectic Kitchen

Yield: 4-6 servings

Prep time: 10 minutes

Cook time: 30 minutes

Ingredients

  • 1 ½  boneless skinless chicken breasts, trimmed  

  • 2 teaspoons kosher salt

  • ½  teaspoon black pepper

  • 1, (20 oz.) can crushed tomatoes

  • 1, (10 oz.) can mild enchilada sauce

  • 1, (4 oz.) can mild diced green chiles

  • 1, (15.5 oz.) can black beans

  • 1, (15.5 oz.) can white beans

  • 1, (8.75oz.) can sweet corn

  • 3 corn tortillas diced

  • 3 cups low sodium chicken stock or bone broth

  • 1 large yellow onion,thinly sliced

  • 1 red bell pepper, seeds removed and sliced

  • 3 garlic cloves grated

  • 1 tablespoon ground cumin

  • 2 teaspoons chili powder

  • 1 bay leaf

  • 2 zucchinis sliced into 1/2" half moons

  • 1 (14 oz.) can coconut cream

  • Avocado, cilantro, tortilla strips*, coconut cream for garnish

Method

Season the chicken with salt and pepper and add them to the instant pot followed by remaining ingredients. Place the lid on the pot and cook on manual high pressure for 20 minutes. Allow the pressure to naturally release for 10 minutes. Remove the chicken breasts and shred them using a fork. Add them back to the soup and serve topped with your favorite garnishes.

*For the tortilla strips, I cut about 4 tortillas into 1/8 inch strips and fried them in about 2 inches of oil until golden. I drained them on a paper towel and sprinkled them with salt.


No-Bake Vegan Tartlets

You have better things to do besides waiting around by the oven.

When coming up for recipes for the blog, I wanted to create not only delicious and healthy recipes, but I wanted to make beautiful dishes too! After all, I am a food stylist at heart. These No-bake vegan tartlets are SO easy and are a total slam dunk. You can make this recipe as one large cheesecake or serve them as individual tarts like the ones pictured above! These tartlets are not nut free, but they are free of gluten, which I know many of you are either trying to avoid or simply can’t tolerate like my friend The Eclectic Kitchen . I hope you enjoy making these creamy, sweet and perfectly tart desserts! Happy “No cooking!”

No-Bake Vegan Vanilla Tartlets

Recipe by: Skylar Edberg in collaboration with The Eclectic Kitchen

Yield: 2 servings

Prep time: 20 minutes

Cook time: inactive 2 hours

INGREDIENTS

for the crust:

  • ½ cup raw cashews

  • ½ cup chopped pistachios

  • ¼ cup flax meal

  • ¼  teaspoon kosher salt

  • 10 medjool dates, pits removed and chopped

  • ¼ cup freeze dried raspberries

  • 3 tablespoons coconut oil, melted

  • 2 tablespoons maple syrup or agave

    For the filling:

  • 2 cups raw cashews soaked in hot water for 2 hours or overnight

  • ½  cup full fat coconut cream

  • ⅓  cup maple syrup or agave nectar

  • ¼  cup coconut oil, firm (not liquid, chilled if necessary)

  • ⅛ teaspoon kosher salt

  • 2 tablespoons fresh lemon juice

  • 1 tablespoon lemon zest

  • 1 tablespoon vanilla bean paste or extract

  • ½  teaspoon freshly ground nutmeg

METHOD

For the crust:

In a the bowl of a food processor, pulse cashews, chopped pistachios, flax meal, salt and dates until well combined and finely chopped. Next, add the freeze dried raspberries, coconut oil and maple syrup and pulse until the mixture resembles wet sand, about 30 seconds.

Firmly press the mixture into the bottom of a springform pan or into the bottoms of 6, 4-inch tartlet pans. Make sure the filling is evenly displaced in the pan/pans. Place in the refrigerator or freezer while you prepare the filling.

For the filling:

In the same food processor bowl (no need to wash), Add the cashews, coconut cream, maple syrup, coconut oil, salt, lemon juice, vanilla and nutmeg. Process the ingredients on high until completely smooth. About 5 minutes. Pour the filling evenly over the crust and freeze the tartlets until completely firm, about 1 hour for mini tartlets and 2 hours if using a larger pan.

Top the tartlets with anything you like! I used fresh fruit, nuts, bee pollen and a drizzle of honey.